 If you run an ecommerce site, you’ve probably struggled with setting prices for your products. Lowering prices is easy, but raising prices seems scary because it has the potential to drive customers away.
In this series of posts we’ll show you how to use your ecommerce data, good testing methodology and some Econ 101 to arrive at the perfect price for every item in your online store.
Calculating Your Demand Curve
As any freshman economics student knows, there is an implicit trade-off between price and quantity. Charge more for a product and you’ll make more money on each unit sold, but you’ll also reduce the number of people willing to buy it. You might find 100 people willing to buy a pair of shoes for $45, but only 90 of those people would still agree to buy them for $50.
This is called a demand curve. The graph below is the most basic demand curve possible—as prices increase, fewer willing buyers can be found, and the decay happens at a consistent linear rate.
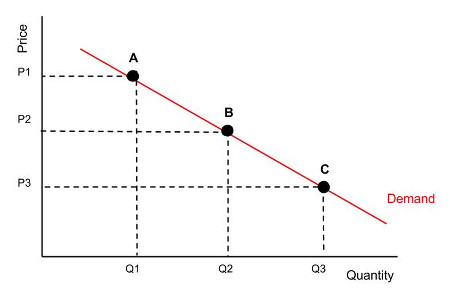
Here’s what’s so hard about setting effective prices: you don’t know your demand curve. Most likely you’ve only ever charged one price for a particular product, and so you can’t answer the question “How many people will buy if I increase the price?” Your demand curve contains the answer to that question.
Pretend You’re A/B Testing
You’re probably familiar with A/B testing. Instead of making big changes to a website and crossing their fingers, smart marketers now make a series of small changes, measure each one closely, and keep the ones that work. A/B testing makes the scary process of website design much more process- and data-driven. Everything is an experiment, data is always being collected, and incremental improvements are being made every day.
Setting prices should work the same way. The process is straightforward:
- Get the right tools in place
- Set your baseline price
- Make small pricing changes
- Collect Data and Measure Results
- Iterate
- Compile
1. Get the Right Tools in Place
You can’t A/B test without effective tools to conduct experiments and measure the results of those experiments. In the same way, you can’t test pricing without tools to easily make price changes and measure the effect of those price changes.
Don’t sweat, though: most shopping cart platforms provide you with the ability to make pricing changes in real-time. Log into your admin panel and make sure you know how to do this.
The key then becomes making sure you can measure the results of these pricing experiments. That’s when a tool like RJMetrics comes in handy—we’ll show you the results of experiments like these in real-time. If you don’t have an ecommerce analytics dashboard already, either look into getting one or get ready to write a lot of SQL queries.
2. Set Your Baseline Price
The first price you set should be based on some basic information.
- How much do you absolutely need to charge to be profitable? (Make sure you include customer acquisition costs!)
- How much do comparable products sold by your competitors cost?
- What’s your best guess based on your knowledge of the market and your customers?
Don’t get hung up on getting this right. Set something reasonable based on information you have at hand, and get ready to do some testing!
3. Make Small Pricing Changes
The key word here is small. While there’s no exact right answer to how much you should experiment with on every iteration, a good place to start with is 1%. So if you’re selling $5 recycled plastic bags, try charging $5.05. If you’re selling $50 hoodies, try charging $50.50.
The smaller the change, the better your data will be but the more experiments you’ll have to run. You’ll have to make the decision about what’s right for you.
4. Collect Data and Measure Results
So you’ve made a small pricing change. Now it’s time to sit back and let the results come in.
Items that sell in high quantity, known as fast-moving or high velocity items, work best for this process. That’s because the more observations you have for an experiment, the more confident you can be in your results.
While there are statistical ways that you can estimate the error bars of your demand curve, we’re not teaching graduate-level statistics here. Just select your fastest moving products, and let the experiments run for a couple of days each.
5. Iterate
Now that you’ve conducted an experiment and the results are in, it’s time to decide what to do next. We recommend continuing to increase and decrease prices incrementally for some time, even if you start seeing a drop-off in quantity sold.
You’re conducting data-gathering experiments: the goal is to gather data on quantity sold at a range of prices, not just to increase your prices by 2% and call it a day. We’d recommend testing at least to a 10% increase and a 10% decrease in your baseline price.
It’s critical that you don’t attempt to draw any conclusions at this stage! You’re just gathering data. Once you have tested a range of prices, it’s appropriate to move on to the final stage.
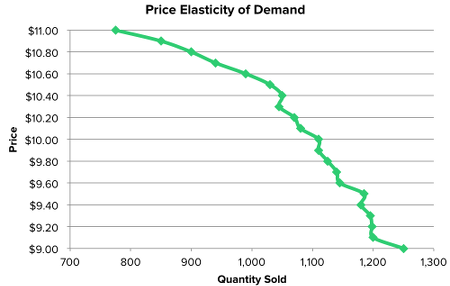
6. Compile
After you’ve collected all your experimental data, it’s time to plot your demand curve. Dump all of the experiments into a big spreadsheet and create a basic line chart. It might look something like this.
Up Next: Setting the Right Price
Now that you’ve come up with your demand curve, you’ve done the hard part, but there’s still a little further to go before you cross the finish line. Stay tuned for our next blog post to learn how to translate this demand curve into the perfect price for your products.
